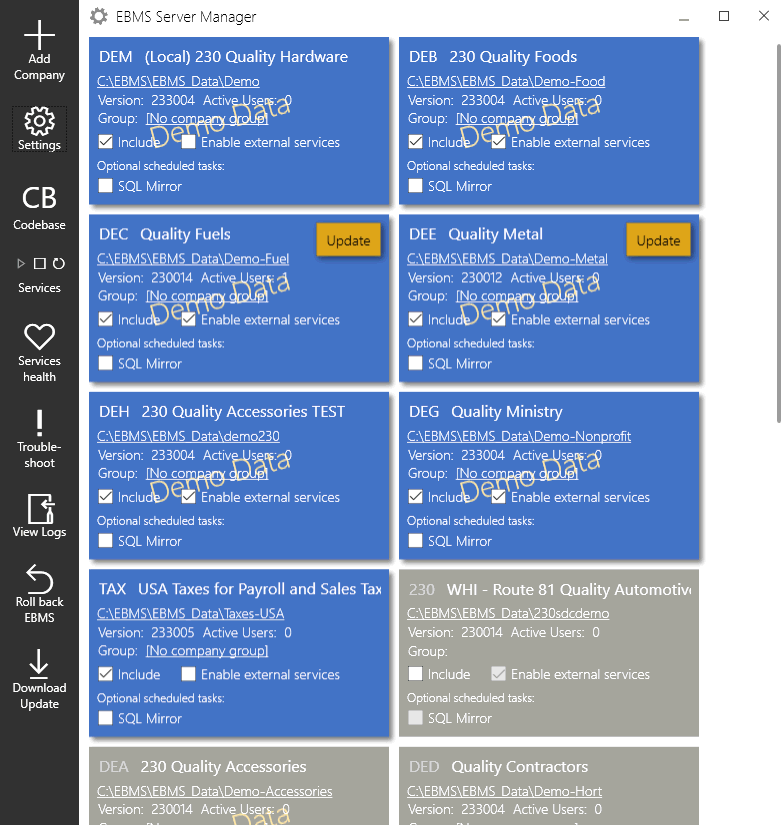
A new company should be created before a user starts to enter company information such as customers and vendors. Multiple companies can be created if the user has the proper license from Eagle Business Software. Review the Licensing Agreement and Limited Warranty Exhibit 1, Multiple Users section for multiple company limitations.
This option exists to add a new company dataset from a blank dataset.
To use this feature, complete the following steps:
A new blank data set named 'NewData' must exist and be placed in the root EBMS folder. Example: c:\ebms
Click on the Add Company
link in the left command bar to show the Create
new company dialog.

Enter the Company name, Folder name, and CompanyID in the Create new company dialog.
Click the Create button.
If an existing company data set exists in an alternate location,
click on the Add existing company
from another location link. This will open the Add
company from another location dialog. (This option is only
available with the EBMS Client/Server
module).
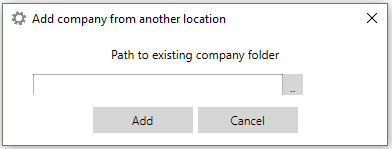
Enter the path to the existing company data folder.
Click Add to save and close the dialog.
Review the Enabling Access to Company Data in EBMS Server Manager section to ensure that the new company will be accessible on the workstations.
Follow the Login Procedures step
to open EBMS on either the data server or a workstation prior to following
the next steps of configuring the data for your new company.

Verify the password that was entered initially. It
is important to remember this password. Click OK to continue. The
following dialogue will open:
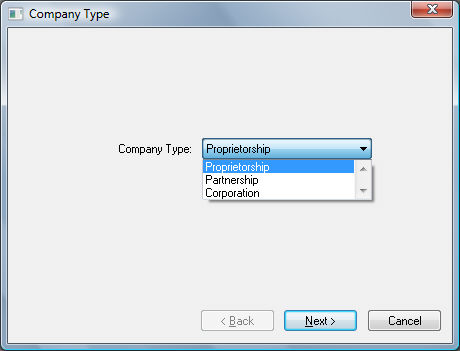
Select your Company Type and click on the Next button.
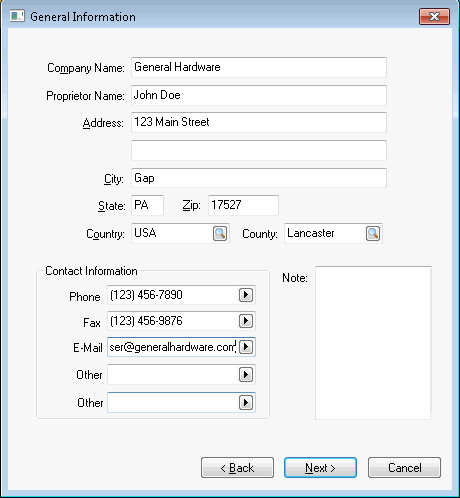
The following General
Information Window will appear. Enter the company information,
and click Next to continue.
A Company logo can be displayed on the main window.
This logo will indicate which company is currently active. If you
provide your company logo in a camera-ready form to the Eagle Solutions
staff, we will install your logo for you. This logo will be printed
or displayed on many of the reports contained in EBMS.
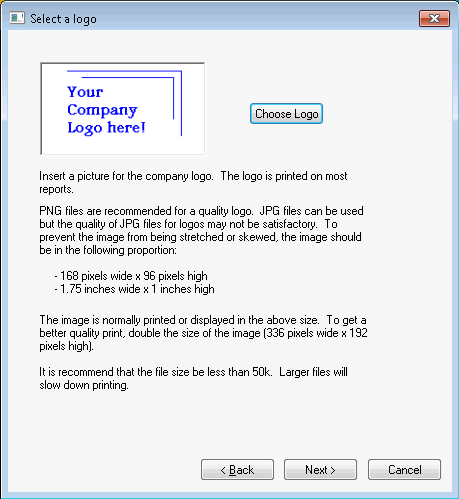
To locate and select the proper graphics file, click on the Choose
Logo button. The familiar Windows <Open Dialog> will
appear, allowing you to select the proper BMP
file on your drive. The graphics must be in the PNG or JPG format
to be used as a logo graphic. This logo can be set up at a later time
by going to File > Company Info
> Logo tab. Review the Logo
section for more details. Click Next
to continue to company information.
Enter the Company
Information:
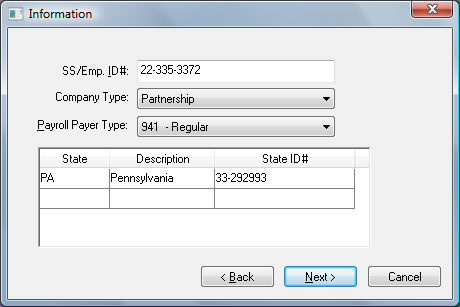
SS/Emp. ID# - Enter the company's Employer Identification Number into this entry field. If the company does not have an EIN number, enter the owner's Social Security number.
The Payroll Payer Type should be set to identify the company's payroll tax classification. This value is used when printing employees' W2 forms.
Enter the State in which the company is located in the first column with a Description or full name of the state or country in which the company resides. Enter the company's State ID# in the right column. Enter each state in which the company's employees reside. This State ID# is printed on tax forms including employee W2 forms.
Click Next
and the Fiscal Information page will open:
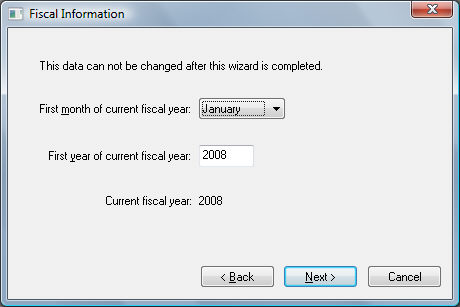
It is very important that the fiscal year is properly set before any information is entered. Set the First month of current fiscal year option to January if the fiscal year is the same as the calendar year. Do not proceed with this wizard until the fiscal year is set. A sole proprietorship or partnership company should set the fiscal year option to January.
Enter the First year of current fiscal year. This setting will normally be the current year unless the company's fiscal year started last year.
A dialog will appear if the payroll module is present in your software.
Enter the current year into the Current Payroll Year entry.
Click the Finish button to complete new company setup.
Multiple data sets (companies) can be grouped to restrict specific user data access. Review the Creating Company Groups in EBMS Server Manager for details.